Well, we had a lovely relaxing time in wet Wales, and actually managed to avoid a lot of the rain, although there were several days when I thought we could be flooded out as the rain was so heavy! I've transferred the photos to my hard drive now, so watch this space as I am sue to post some as and when I get the chance. Unfortunately, I am now on a mammoth catch up to get all the work done I should have been doing whilst we were away. the trouble with being self employed is that when you take time off, the work just does not get done so, of course, that means no fee notes are sent out and no money comes in....looks like I'm going top be extra busy for the foreseeable future ;).
Of course, what I really want to be doing is crafting and I did manage to make some cards whilst I was away. I would have made more (I had plans to make several albums and some pencil boxes) but I ended up forgetting my score board and was at a complete loss!
This is the kit I had fun with though:

Isn't it gorgeous? I love Aimee's kits and they just see to get better and better! Those journal cards are lovely, and I was going to make something with those or the stackables (which are truly gorgeous ;)) but then I saw these:

I originally started off making cards, etc digitally, so did not have a lot of equipment (Big Shot, dies, punches, stamps and so on) to start off with, so I decided to make cards using just the kit and templates (but I did end up cheating and used some antique ribbon on one of the cards though ;) ). After all, if all you have is the digital kit (which you can print as many times as you like), can you really make cards and stuff without adding anything or having to have all the necessary tools?
Well, this is the proof that you don't have to have lots of gadgets, ribbon, buttons and so on:


Pretty neat, huh (and modest of me, too!!!)? The bottom card was created using one of the templates. I made a digital scrapbook page as you would normally, then scaled everything down to fit an A6 card, transferred each paper and element separately onto an A4 image and then printed everything out. I then had the long job of cutting everything out, which is the one thing that always seems to take the longest time! You really do need decent scissors for this though, especially for the fussy cutting out, and I use the Stampin' Up! Paper Snips. They are just about the best small scissors I have ever used!
Anyhow, I then used my original scrap page as a guide (although this was complicated by the fact that my youngest son was trying to play Minecraft on my laptop at the same time as I kept checking the scrap page ;)). The final card is not quite as per the template and I put that down entirely to my son hogging my laptop!
The top card was made using slightly different elements and papers from the kit but this time with no template.
As you can see, whilst my cutting out is not 100% perfect (probably far from it unfortunately), it just shows you can make cards using digital kits which is an added bonus, as you will never ever in out of the digital paper and embellishments provided you don't delete the files form your hard drive ;).
Why don't you have a go and see what you can come up with? You might even surprise yourself!!! If you do use a digital kit to make real life cards, please leave a link in the comments so I can see what you have done :).
Happy Scrapping!
In May I had the chance of working with the Project 365 May kit by Digilicious Designs and it is scrumptious:

Lovely colours, amazing kraft papers and some really yummy quickpages, papers and elements! What's more, they are all on sale at the moment too, so why not go snap up a real bargain while you can?!!!
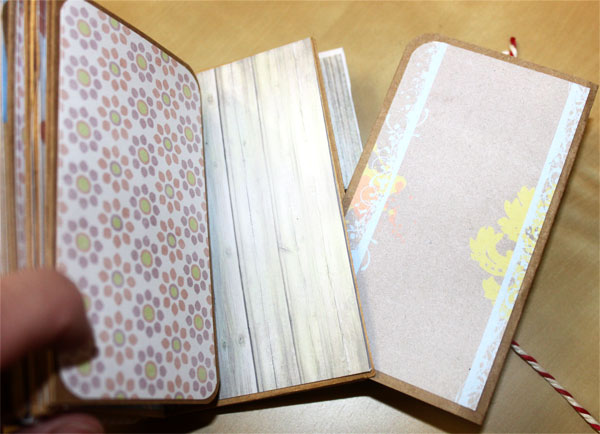
One of the great things I love about digital kits is that you can not only use them digitally, but you can also print them out and create hybrid items with them. With the May project 365, I had a field day! The first thing I created was a mini envelope album. I started with 6 small money envelopes from Tesco's (they measured 12.2 cm by 7.7 cm (4 13/16" by 3") and were really cheap, another good point in their favour!) and this is what I ended up with (please excuse the poor quality of these photos. I only have artificial light in my office and sometimes, even photoshopping the results just does not show the true colours of these projects):

The envelopes were used to make the pages and then I made the covers from empty ice cream cone boxes! I added the heart brads at the front and back, mainly to keep the covers attached to the central binding as I had trouble getting it all to stick together ;). The fastener was made using my cropodile and baker's twine. In case you are interested, I got the baker's twine a while ago from www.butchers-sundries.com. I know, I know, getting craft items from a butchers website, absolutely shocking, but believe you me, you get far more baker's twine for your money from them than you do from the craft websites. It is fairly thick twine though, and only comes in three shades (red/white, green/white and blue/white).
I then added inserts and tags as you can see below:

The inserts were made from kraft cardstock which I picked up at Ally Pally in March. And don't you just love the printed cardstock from the kit

They were double inserts as you can see and they folded over and fitted perfectly into the side of the album:

Love the blue flowered paper too ;)!
I really had a lot of fun making this album and either I am getting quicker at making them, or else the smaller size made a huge difference (or maybe it was a bit of both?!!). When I made the A5 size album, it seemed to take forever, probably several days' work (although not all in one go though) whereas this was several hours instead of days.

Well, I couldn't stop there, now, could I? I managed to get my hands on the hybrid trufflebag template by Carin Grobe Design:

The template is so easy to use but just one word of warning. Don't cut out all the semicircle on the lid like I did - you only need to cut out the curved part of the semicircle, so it can be folded over into the hole underneath to fasten the bag. Sigh, I guess I should read the instructions properly before snipping away at everything!
Still, with a bit of glue and some gems, I managed to rescue the whole thing! So firstly, here we have the birthday card:

This was made using the Project 365 May kit again, and I printed the hearts and the paint strokes onto a sheet of A5 cardstock. The flowers were punched from kit papers (I used Woodware punches) and added gems to the centre of each flower. The leaves were also from a kit paper made using a quilling leaf die and then I used a crimper to get the crinkled effect. The "happy birthday" was printed on to photographic paper, trimmed and then adhered to one of the kit papers and trimmed again before sticking to the card with 3D foam pads. All in all, I love how this turned out. And, of course, the great thing about it is that I can create the same card over and over again as I will never run out of the kit papers and elements since they are all digital!
So, the truffle bags........even with the slight hiccup with the fastening, I am really please with these too:

Aren't they just the cutest thing you've ever seen?

They are gorgeous, absolutely gorgeous and really just finish the whole set off perfectly:

Even hubbie was impressed!
Well, I now need to post the items I made with one of Aimee's kits, so I will be back shortly to show you that!
Happy Scrapping!


 Posts
Posts


