Well, last weekend we had absolutely glorious weather (of course, it wasn't a Bank Holiday weekend!) and I just happened to be in Plymouth collecting our daughter from Uni as she has now finished for the year (part timer!).
I arrived late Friday evening just after midnight to discover the inner door to the flat had blown shut in the wind and she was locked out..... Well, after finding out the step ladders were too short to allow her bf to climb in through the bedroom window (her room is on the first floor) and then having her try to hunt in the garden for another pair of ladders only to trip over a step in the process and graze both her knees, we discovered that the lock to the inner door could be jiggled. the only problem was, there was a metal plate in front of it which prevented you being able to jiggle enough to get the door open. However, one trip by her bf to his house to collect a variety of screwdrivers later, my daughter then unscrewed the metal plate whilst I held the torch so she could see what she was doing (of course, being a student flat they had not replaced the light bulbs downstairs when they went...sigh!) and then bf sprised the door open whilst she jiggled the lock. Fun and games all round, but at least we got in. I really didn't fancy sleeping on the floor or in the car until we could get hold of the landlady!
So, the weather then being as lovely as it was, we went to Lydford Gorge on the Saturday and these are a few photos (I won't bore you with all of the several hundred photos I took!):


I love the effects you can get just by changing some of the settings on the camera!


Don't we just have the most beautiful countryside?
All in all, we had a great day out and I know I for one came back exhausted!
We woke the next morning to torrential rain so of course, we decided that the weather was definitely going to improve and we were going out no matter what! So off to Buckfast Abbey we went!


Brilliant blue skies!

A trip to the Orchard garden:


Then a gentle stroll around the grounds:


Yet another day when I ended up exhausted!
In May I had the chance of working with the Project 365 May kit by Digilicious Designs and it is scrumptious:

Lovely colours, amazing kraft papers and some really yummy quickpages, papers and elements! What's more, they are all on sale at the moment too, so why not go snap up a real bargain while you can?!!!
One of the great things I love about digital kits is that you can not only use them digitally, but you can also print them out and create hybrid items with them. With the May project 365, I had a field day! The first thing I created was a mini envelope album. I started with 6 small money envelopes from Tesco's (they measured 12.2 cm by 7.7 cm (4 13/16" by 3") and were really cheap, another good point in their favour!) and this is what I ended up with (please excuse the poor quality of these photos. I only have artificial light in my office and sometimes, even photoshopping the results just does not show the true colours of these projects):

The envelopes were used to make the pages and then I made the covers from empty ice cream cone boxes! I added the heart brads at the front and back, mainly to keep the covers attached to the central binding as I had trouble getting it all to stick together ;). The fastener was made using my cropodile and baker's twine. In case you are interested, I got the baker's twine a while ago from www.butchers-sundries.com. I know, I know, getting craft items from a butchers website, absolutely shocking, but believe you me, you get far more baker's twine for your money from them than you do from the craft websites. It is fairly thick twine though, and only comes in three shades (red/white, green/white and blue/white).
I then added inserts and tags as you can see below:

The inserts were made from kraft cardstock which I picked up at Ally Pally in March. And don't you just love the printed cardstock from the kit

They were double inserts as you can see and they folded over and fitted perfectly into the side of the album:

Love the blue flowered paper too ;)!
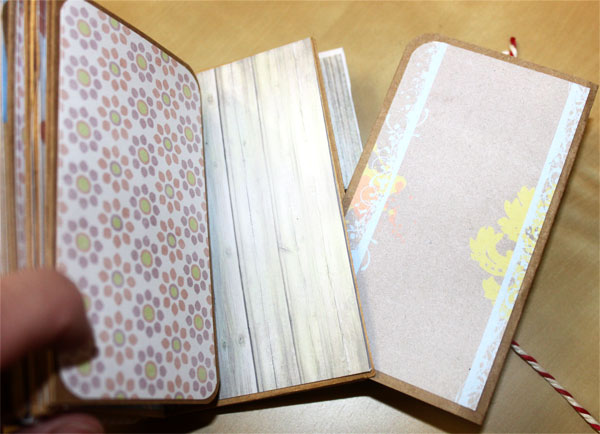
I really had a lot of fun making this album and either I am getting quicker at making them, or else the smaller size made a huge difference (or maybe it was a bit of both?!!). When I made the A5 size album, it seemed to take forever, probably several days' work (although not all in one go though) whereas this was several hours instead of days.

Well, I couldn't stop there, now, could I? I managed to get my hands on the hybrid trufflebag template by Carin Grobe Design:

The template is so easy to use but just one word of warning. Don't cut out all the semicircle on the lid like I did - you only need to cut out the curved part of the semicircle, so it can be folded over into the hole underneath to fasten the bag. Sigh, I guess I should read the instructions properly before snipping away at everything!
Still, with a bit of glue and some gems, I managed to rescue the whole thing! So firstly, here we have the birthday card:

This was made using the Project 365 May kit again, and I printed the hearts and the paint strokes onto a sheet of A5 cardstock. The flowers were punched from kit papers (I used Woodware punches) and added gems to the centre of each flower. The leaves were also from a kit paper made using a quilling leaf die and then I used a crimper to get the crinkled effect. The "happy birthday" was printed on to photographic paper, trimmed and then adhered to one of the kit papers and trimmed again before sticking to the card with 3D foam pads. All in all, I love how this turned out. And, of course, the great thing about it is that I can create the same card over and over again as I will never run out of the kit papers and elements since they are all digital!
So, the truffle bags........even with the slight hiccup with the fastening, I am really please with these too:

Aren't they just the cutest thing you've ever seen?

They are gorgeous, absolutely gorgeous and really just finish the whole set off perfectly:

Even hubbie was impressed!
Well, I now need to post the items I made with one of Aimee's kits, so I will be back shortly to show you that!
Happy Scrapping!

Isn't it gorgeous? I've linked the preview to the shop at the Digital Scrapbooking Studio in case you want to take a closer look.
I decided to make two card box sets to try and show the versatility of this kit. Whilst it is meant to be more of a Mother's Day kit, there are definitely some more masculine papers hidden in there. Whilst I was not completely successful in making a masculine card box set, these are what I came up with:

The box was a basic
template found on the internet but I made fasteners by punching out a 1"
scalloped circle on kit papers and then cut out two of the kit brads for the
inside of the fasteners. I added the ribbon
from my stash and used my cropodile to insert the eyelets.
The "Happy
Birthday" was made using the kit alpha, printed onto photo paper and then
cut out and trimmed with a background layer of paper added.
The two butterflies
were from the Tim Holtz/Sizzix Fanciful Flight die and I added the bakers twine
from my stash to complete the cards.
One of the other two
cards was made using the scraps of paper left after I had cut out the card
backgrounds, with brads from the kit covered in glossy accents and attached
using 3d foam pads. On the fourth card I
cut out one of the buttons and added gemstones. The red and green banner effect is from papers where I used
the Vintage Lace die by Tim Holtz/Sizzix. It's actually made using the left over paper once you pull off the die cut lace!
This is the second set I made:

The box was another template from the internet and the flower on the front of
the box was from the kit. I printed two
copies of the flower, fussy cut them out and then cut down each petal before
sticking the flowers together and onto the box.
I curled the petals slightly to give more of a 3D effect.
The cards were
created using papers from the kit and plain cardstock whilst the flowers were made using my Tim
Holtz/Sizzix tattered florals die. I love that die and am always using it! The
lace effect borders were made using papers from the kit and the Vintage Lace
die, again from Tim Holtz/Sizzix. The
"Happy Birthday" was from the kit alpha as noted above.
Both sets look turned out really well, and jut o to show how you can create two completely different sets of cards using the same kit. You have to love digital papers, because you can just print off the ones you need and you never run out!
I'm off to go read a book now and have a glass of wine, so happy scrapping!




Well, it seems an age since Mum and I went to Alexandra Palace but we had a whale of a time. We left home early and managed to get to Ally Pally about half eight in the morning, so were able to get a parking space just outside the Ice Rink. We then had a gentle wander around to the entrance and whiled away the time with coffee and a bacon baguette which we shared!
The queue to get in was already starting to build up when we got there, hence the coffee break as mum can't stand for long, We went in after the first rush and I did think that since there were far fewer exhibitors than at the NEC we would be in and out in a couple of hours. I was so wrong in that as by lunchtime, we had still only reached the second row of stalls (we started at the bottom and worked our way back to the entrance)! I managed to spend all the money I had left over from the NEC plus some extra on top so it was a very successful day!
I still haven;t had chance to do much as yet as my other news is that I have become a Stampin' Up! demonstrator. I have a new blog for this (well, all I have is the original page and the blog name as I haven't had chance to post anything or even change any of the default layout as yet but I am hoping to get all this sorted this weekend and will let you know the details then!
I've actually been busy these past few weeks spending most of my time at a client's trying to finalise their 2012 accounts and today I finally managed to get the accounts finished and the tax returns filed online so I am definitely in a celebratory mood tonight. I am about to go get a glass of red wine and am only sorry I don't have any chocolate to go with it!
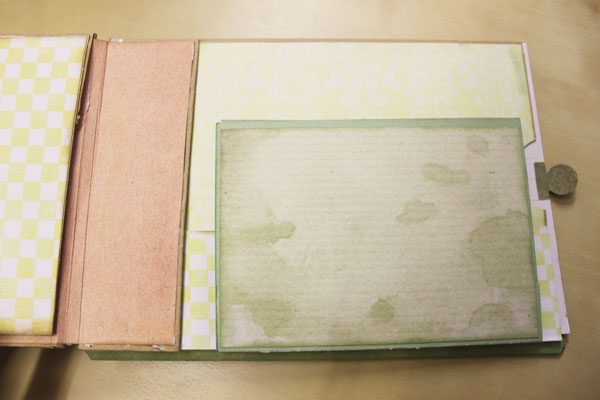
Still, I though I would leave you with a photo of a mini album I made last week. I used Color My Wold by Aimee Harrison Design Studios and she is a star as she even included the proper spelling of colour in the wordart in the kit!

The kit is lovely, and is definitely the sort of thing you can easily use for albums and cards, it is so versatile. I have plans to make a couple of birthday cards with this but as usual, work has taken priority....still, it is the bank holiday weekend coming up, so who knows?!!!!
Anyhow, back to the mini album and here it is:

I printed one of the kit pages on top a sheet of A4 cardstock and then folded and cut the card to make the album. the lace effect on the edges is from another kit page which I used my Tim Holtz Vintage Lace die on. I printed and cut out two copies of one of the flowers and then added a gem to the centre before gluing onto the front cover of the album.
Inside, the pages were stuck together using buttons printed from the kit to make the holders for the tags. The tags were made from the kit using papers and elements. I left the backs of the tags blank so I could add journalling, and there is space on each tag for mini photos.
I love the way this turned out and it was so easy to make, too. As usual, though, it took longer to cut out and stick everything together than anything else!
Oh well, that glass of red wine is calling my name now so I'm off to celebrate filing those tax returns!
Happy scrapping!
Well, as promised earlier, this is a look at my pages from the March Project 3265 kit by Digilicious Designs:

It is yet another beautiful kit and a real joy to work with. I just love the versatility of digital kits, and the best thing is you can use them again and again unlike paper kits when once you have used the paper, that is it, it is gone.
I didn't make quite so many pages this time round, mainly because my folder was getting full and I wanted to leave room for inserting photos, tickets and stuff. I used an A5 folder which I recovered using the Project 365 January kit, and the pages are made from papers printed into A4 cardstock. I print two pages to each sheet of A4 so that when folded, they fit into the A5 folder nicely.
I love all the delicate flower work in this kit, and the butterflies are just gorgeous (there are 3 different ones in the kit). there weren't quite as many notecards this time round, which gave me the chance to create my own pages (not that I couldn't have done that with the earlier kits though, but I just felt lazy and used the notecards!).

the alphas in this kit are really gorgeous. I love the grungy type of paper/element, so they really fitted in well. Then just look at this dress model. Isn't it gorgeous?! It really makes me want to go and get the Tim Holtz sewing room die!

I love the little "note to self" too.
Please excuse the over exposure in the photos. My office has no windows, so it is all artificial light plus the flash from my camera, and even messing around in photoshop afterwards doesn't seem to fix it quite right (which probably has more to say about my poor photoshop and photography skills rather than anything else ;) ).
Then look at the double page of the bird baskets hanging from the trees - I just sat and ooh'd and aah'd when I first saw this in the kit!

I really need to start using this book now that it is complete but where on earth do I find the time? Life seems so busy at the moment, with work and everything else that is going on. I know I am always saying this, but I really need an extra hour a day and an extra day a week to be able to stand any chance of getting half the things done that I need to do!
This week would have been ideal to catch up on crafting, but if my mum is up to it, we will be going to Alexandra Palace for the craft fair there. the really good things is they have free parking, so that means I can drive to London and park for free not that far from the city centre. Now that was an offer too good to miss as parking in London is extortionate!
I'm really looking forward to this. Dad is coming along too (so he can go wandering around London whilst we are at the craft fair) and my daughter is also tagging along as she is going to meet her boyfriend in London. He's getting the coach up and they will spend the day sightseeing. Mum and I will be having a whale of a time at the craft fair and hopefully will pick up some bargains. I have heard that it is a great event if you are a stamper and much better than the NEC, although there are nowhere near as many exhibitors. If you are going, look at for me and my mum. I'll be the one with glasses carrying all the bags and she's the one with two walking sticks!
Happy scrapping!


I have to say that this series is turning out to be one of the best collections ever and I love every kit so far. They are all different, so it is not a case of elements, etc being recoloured for each month. Each kit stands on its own and the notecards, papers and elements are all unique. One or two elements are similar (the pointing hand, for instance) but that is only to be expected in a Project 365 kit.
I've actually just finished making more pages with the March Project 365 kit so will be back later to show you pictures of those but unfortunately, I now have to go check my inbox which has over 400 unread messages in it....this is what comes of not checking your emails over the Easter weekend!
Happy scrapping!
Well, I hope you have all been enjoying the Easter break and haven't had to work over the weekend. I have been very lazy and have spent most of my time crafting although I did manage a trip to Attingham Park with my daughter as well as a shopping trip!
Last week was a real rush to try and get everything finished before Easter. I ended up spending all of last Wednesday night making Easter baskets and Easter milk cartons to give as gifts on Thursday, so as a result didn't get to bed until gone 2 am....I really don't know how people manage to get everything done well before time. I always end up leaving everything to the last minute and rushing to get everything finished as things always take me longer than anticipated....maybe I should just try to be more organised and make a start well before the due date?
Anyhow, I was lucky enough to be able to work with Clearly, by Aimee Harrison Designs:

It is a gorgeous kit and the whole collection is actually on offer at the moment so is a real bargain! Whilst it is not your typical Easter kit, there are some really lovely papers in there. I only ended up using three of them, but this is what I made:

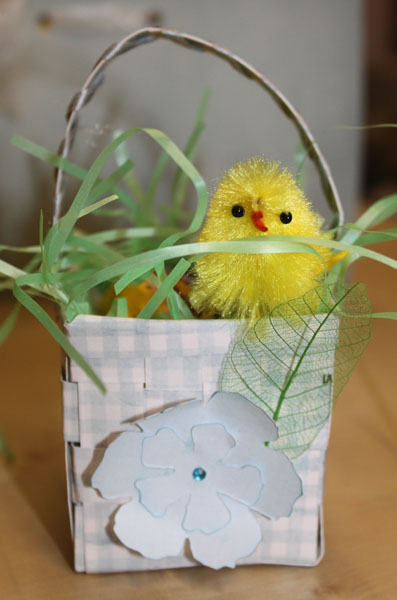
The blue basket was given to my daughter, but I actually made some using one of the brown papers in the kit which, to be honest,m I think turned out better. the strips were wider (about 2 cm) so they were easier to manipulate and weave. I was really pleased with how they turned out.

You can see the milk cartons I made as well lurking behind the baskets. They were so easy to make, it was basically a case of using the template from Stampin' Up and sticking the whole thing together. The only fiddly it was trying to work out how the top went together, and the ribbon soon hid any mistakes I made! I actually think the cartons would have looked better with tags or a label at the front, but since it was 2 am by the time I had these finished, I really didn't feel up to doing any more!
Then finally, I made a gift holder for my youngest son, and yes, I know it's a bit girly but I was experimenting and needed a large holder to cover the Cadbury mini eggs hidden inside, plus it was Saturday evening and I needed this ready for Easter Sunday morning! As you can see, the tattered florals die was used again (oh, I love that die!) on the kit papers along with my distress inks. The trim at the top and bottom was made using one of the kit papers and the Tim Holtz Alterations vintage lace die.

I reckon the all of these can be used other than at Easter so why not give it a go yourself? I love being able to use digital papers, and elements as you never have to go back to the shop to buy more when you run out - you just print some more!
I'm off not to run a payroll - no rest for the wicked, eh? So have fun whatever you are doing and happy scrapping!


 Posts
Posts


