Creations by AR: Customer blog hop - Mom's favourite colour
8 comments Posted by Lynn at 5/09/2013 09:40:00 amWelcome to the Creations by AR customer blog hop! I hope you are enjoying the beautiful creations by the other participants, and that you find mine of interest. This is the last blog in the hop, and you should have come here from Raissa's blog. The other blogs are (just in case you missed any!):
Lisa Eisner
Jennyfer Leung
Diana Auberle
Mary Roberson
Gigi Lorenc
Deb Speijers
Lenoria Kelly
Rhonda Miller
Carmen Mitchell
Raissa Spatola
Lynn Clifford (I'm the last stop!)
There are 11 stops on the blog hop and if you want to win a template of your choice from the store, just leave a comment on each blog to be in with a chance of winning. One comment will be chosen from all the blog comments as one of us is the mystery blogger!
Comments for the blog hop prize will close at midnight (EDT) on Saturday 11 May. The winner will be announced on Sunday 12 May on Lisa's blog and on the Creations by AR Facebook Page. Speaking of the CbyAR FB Page, if you haven't already done so, you may want to 'Like' the page so you can be kept up-to-date on all the latest happenings.
Well, I know Mother's Day in the USA is coming up soon, but we had ours way back in March here in the UK! So I decided to use one of Adela's templates to make a tag holder. Also, I know the theme is Mom's favourite colour", but being a mum myself, I cheated and used papers that I really like rather than pinks and girly colours! I'm afraid I do love grunge and Tim Holtz papers!
This is the template I used:

Nice, eh? It is actually a really easy template to use too and so simple to print it out on a sheet of A4 plain white card stock to make a template. Of course, you can just print it out with digital papers and make the carry all in one easy step, but I wanted to use papers from my stash, hence the need for an actual template.
Also, in order to create the tag holder, I needed tags, so I made another card stock template from one of the tag templates from the Library Pocket set:

I then broke into my Tim Holtz card stock stash, using a sheet of Kraft Resist for the carry all, and a sheet of Lost and Found card stock for the tags. Once I had cut everything out, this is what I ended up with:

And here are the tags (I also punched four tabs for the top of each tag using my Stampin' Up! tag punch):


The edges were then adhered to the bottom of each side of the Carry-All:

This photo is maybe a bit clearer:


Of course, you include more tags in this by increasing the size of the concertina folded card by 1" for every additional tag. I just went with four tags for this one.


I decorated the outside of the carry all with butterflies cut from another sheet of the Kraft Resist paper and here is the finished article:


As you can see, I also added antennae to some of the butterflies/moths using thin wire and used distress ink on the edges of everything for more definition.
This only took about an hour or so to make, as they are both such easy templates to use (and I am all for an easy life ;)). It would make a lovely mother's day gift holder, especially decorated with flowers which is what I intend to do next, once I have got this set of accounts and query letter out to my client later today!
Don't forget to go visit everyone else on the blog hop to see what they have made and to leave a comment so be in with a chance of winning a template from the store!
Lisa Eisner
Jennyfer Leung
Diana Auberle
Mary Roberson
Gigi Lorenc
Deb Speijers
Lenoria Kelly
Rhonda Miller
Carmen Mitchell
Raissa Spatola
Happy Scrapping!
Life seems to have been really hectic around here recently with one thing and another. I'm now taking my Dad to hospital once a fortnight for chemotherapy as he has cancer - he found out just before Christmas so that was a present he didn't want to receive :(! He now has a PICC line in his arm and has the drugs intravenously at the hospital and is then sent home with a pump attached containing more drugs which take 48 hours to get through the PICC line. There is then another trip to the hospital to get the pump removed, which I do if it is a weekday (my brother is doing the weekend trips).
He seems to be doing really well though, and apart from being very tired, has had no side effects to mention, which is a real blessing. Mind you, there are people praying for him in my church and I have a friend in the USA who has her church praying for him too so you can take your pick as to which you think it is - the power of prayer, the right dosage of chemo, his age and fitness, or whatever. I know what I think and I thank God he is doing ok.
Apart from that, life goes on here pretty much as usual - I'm overworked, underpaid, totally unappreciated, lol!! I really don't know where the time goes and 24 hours in each day is nowhere near long enough to get everything done ;). I am having great difficulty getting any decent crafting time in...sigh!!!
Still, look see what I found the other day:

Collage Craft by Polka Dot Pixels - isn't it just scrumptious? Now this is a kit that definitely calls for being turned into an album and it just so happens I was able to sneak a little bit of time here and there to make this:

This is a quick look at the inside pages:

Well, it is the May Day bank holiday here this weekend and I have a craft fair to make samples for, a walk planned with my son (unless he can wriggle out of it somehow ;)!), our eldest son is coming home for a day and I am taking part in a line dance demonstration, so with bookkeeping at a client's all day tomorrow and a very exciting trip to the cancer centre at the hospital on Friday, I reckon I am pushed for time yet again!
Well, whatever you are doing this weekend, I hope you have fun and enjoy the bank holiday - apparently, the weather forecast is for good weather (unbelievable I know - sunshine in the UK on a bank holiday is practically unheard of. We usually get rain, buckets of it!).
Hope you can find time for scrapping, whatever else you are doing!
Nibbles Skribbles recently released a really neat kit, Soar:

Now the great thing about digital kits is that was well as using them for scrapbooking, you can also use them to make some really quick and easy cards. Take a look at these:

For the first card, I used the kit flowers for the cluster then added the leaves and butterfly. For the second card, it was just the bird, cloud and wordart from the kit. Nothing could have been simpler! I printed them out, cut the printout down to size, added ink around the edges and adhered them to the base card.
So if you are looking for a quick and simple birthday card, why not try something like this? It is so easy, you will kick yourself for not having done it before!
Happy scrapping!
I have obviously got the bug as regards wall hangers, because look what I made for The Hybrid Chick blog:

It is has a clear report cover above the background papers so I can write in each month's appointments as well as my to do list, and it is now hanging on my desk as a reminder of everything I have to do. I am sure I will find this so useful, much better than umpteen different post it notes and scraps of paper with snippets of information on them!
It really was easy to do - an A4 piece of chipboard, a sheet of patterned paper and then I made the calendar holder from a template and the to do list is actually printed on the background paper.
Full details of how I made can be found at The Hybrid Chick, so why not pop along and take a look? There are also some amazing projects by other Digichicks, and it has always been my "go to" website for hybrid ideas! You are sure to find some inspiration there!
Happy Scrapping!
Well, when I visited our local craft shop a couple of weeks ago, I noticed she had some chipboard in stock. Now never having used this (I usually end up using used cereal boxes as the base for the covers of albums, etc!), I thought I would give it a go. So, armed with a sheet of chipboard I decided to make a small wall hanger. Well, to be honest, I actually decided to make a large A4 size hanger (but I haven't sorted out the photos for that yet ;) ) and then made a further two small hangers using the left over chipboard. Mind you I would never have believed chipboard was so hard to cut (even though it is kind of obvious....! ). I ended up using my craft knife and struggled using that at first.
For the first hanger, I used a gorgeous mega kit from The Studio:


Here's a close up of the flower:

Truly scrumptious right?!!!
I then used a completely different kit from The Digichicks but can't show you that yet as the kit hasn't been released. I'll be back over the weekend with photos of that along with one or two other things that I have been making :). But right now, I have to go run a payroll and prepare two VAT returns.......I know, I lead such an exciting life, you have to wonder how I cope!
Happy Scrapping!

Well, a big thank you to everyone who hopped with us this weekend and left comments. The winning comment actually came from this blog and was left by Jess!

Congratulations Jess!
If you send Lisa an Email, she will get your new template to you!


Here's a close up of that flower. Isn't it gorgeous? It does need a gemstone added to the centre though, but I have put mine away somewhere and can't find them....this is what comes of working all hours in January, as my office is a complete tip, there are papers everywhere, I can find nothing and have not got the energy to even make any attempt at cleaning it up! The spirit is willing but the flesh is so very weak - I keep sitting here telling myself I really must tidy the office but then I really do need to finish Case 2 of the Criminal Minds game I was given for Christmas, make an envelope album and a wall hanger/organiser, mini boxes to hold truffles and card/envelope sets, work on my Stampin' Up! blog and set up a FB page for it, spend some more time seeing out how my new tablet works (my treat for all the hard work in January ;) ), prepare more cards, gift boxes, and "stuff" for the craft fair next month, watch some films, create some tags in Photoshop,.....the list just goes on and on!

But don't forget the bird, and all that fussy cutting I had to do! I just wish I had some white feathers to hand to make the bird look even more realistic (the ones shown here are on the printout!).

Not bad for four used toilet rolls, eh?!!!

Have a go yourself at one of these, they are so quick and simple. I'd love to see what you come up with.
Happy scrapping!
Well, it is Valentine's day coming up so of course, you need a suitable gift box for that special person in your life. After a quick search on the internet (I just googled "heart box template" - so easy!) , I found a suitable template and then used a digital kit I had had for a while but not used.
The kit is actually called Blue Rhapsody (and yes, I know hearts are supposed to be red, but the kit was too gorgeous not to use!):

Now you'll have to agree that is one gorgeous kit, right? It actually just shows how busy I have been (can you hear the violin strings playing in the background?) since this is a Christmas kit and it is now February when I am using it! I've linked the preview above, so if you wanted to go check the kit out, just click on the picture and it should take you straight there.
Anyhow, this is the end result:


Creations by AR ‘Love is in the Air’ Customer Blog Hop
15 comments Posted by Lynn at 2/08/2013 11:00:00 amWell, now that the pressure of the tax filing deadline has passed, I have some free time in which to craft, finally! I do miss the scissors and glue when all I have time to do is work, work and then even more work on top of that....
Anyhow I thought I would try something different this time around and it turned out the Adela Rossol was having a customer blog hop. Now, if you have never seen any of Adela's templates, you are in for a real treat if you go check them out at creationsbyAR.com. There are some amazing templates there, and they would all definitely keep me out of mischief for quite some time! Not only that, but if you leave a comment on each blog or on the Creations by AR Facebook page, you are automatically entered into the draw to win an as yet unreleased template - brilliant!
If you have found your way here from the blog hop, here are the other participants:
You should have arrived here from Raissa's blog, and the next stop is Gina, but first, please take a look at what I made......
I'm a great believer in getting the most out of templates, so whilst I decided to use the library pocket set......

......I wanted to make more than just a card. I mean, we buy these templates, right? But do we really need to restrict ourselves to just the one type of use? Why not get as much use out of them as possible, adapt them, play with them, have fun with them? Yes, this library pocket set makes a great card front, but if you don't cut the flaps for the pocket on one side, you can also make a mini album!!!
I actually used a digital kit for this album, one I have had for a while but due to pressure of work (as always :( ), hadn't actually used. I fell in love with this kit as soon as I saw it, and it seemed perfect for a romantic Valentine's album:

Isn't that gorgeous? This is a really beautiful kit, and I have plans to make much more use of it! But back to the library pocket set....
I started with the template, printed it out on plain white cardstock and then cut it out (I don't have a cutting machine although that is now top of my wish list!). However, I did extend one side in order to make the album as shown here:

I cut out six pockets and six tags (on cardstock with the digital papers printed on), then cut two covers to fit, covering those with printed digital papers. I put the album together using my Bind-it-All machine and added skeleton leaves and organza ribbon to finish it off. Plus, since this is Valentine's Day and all, I added some hearts using a Stampin' Up! punch. I distressed the edges of the hearts using Milled Lavender distress ink, and added extra hearts to the inside pages using distress ink and the negative from the punched hearts:


The flower is from my ever faithful Tim Holtz tattered florals (I really don't know how I ever managed without that die!):

I love that die and it really shows up the variation in pattern on the papers.
Here are tags:

And the inside pages:


Love those papers from the kit. Of course, you can use any papers and I am already part way through another album using Stampin' Up! papers.
I then decided to use another of Adela's templates that I have, Tray Chic:
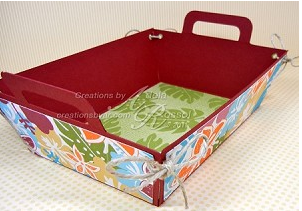
Isn't that neat? I again used the same digital kit, this time with added Cadbury's buttons!


The buttons add the perfect finishing touch, don't you think?!!! Of course, they are not going to last long in this household!
Please do take a look at the other entries in the blog hop. Adela has some gorgeous templates and they have done some amazing work with them. Your next stop on the blog hop is Gina.
Please remember to leave a comment below (and on the other blogs) to be in with a chance of winning an as yet unreleased template from Creations by AR. Comments will be accepted through midnight Eastern time on Sunday, February 10. The blog hop winner will be announced on Monday February 11 on the Creations by AR Facebook page as well as on my blog.
Happy scrapping!


 Posts
Posts


