Creations by AR ‘Love is in the Air’ Customer Blog Hop
15 comments Posted by Lynn at 2/08/2013 11:00:00 am
Well, now that the pressure of the tax filing deadline has passed, I have some free time in which to craft, finally! I do miss the scissors and glue when all I have time to do is work, work and then even more work on top of that....
Anyhow I thought I would try something different this time around and it turned out the Adela Rossol was having a customer blog hop. Now, if you have never seen any of Adela's templates, you are in for a real treat if you go check them out at creationsbyAR.com. There are some amazing templates there, and they would all definitely keep me out of mischief for quite some time! Not only that, but if you leave a comment on each blog or on the Creations by AR Facebook page, you are automatically entered into the draw to win an as yet unreleased template - brilliant!
If you have found your way here from the blog hop, here are the other participants:
You should have arrived here from Raissa's blog, and the next stop is Gina, but first, please take a look at what I made......
I'm a great believer in getting the most out of templates, so whilst I decided to use the library pocket set......

......I wanted to make more than just a card. I mean, we buy these templates, right? But do we really need to restrict ourselves to just the one type of use? Why not get as much use out of them as possible, adapt them, play with them, have fun with them? Yes, this library pocket set makes a great card front, but if you don't cut the flaps for the pocket on one side, you can also make a mini album!!!
I actually used a digital kit for this album, one I have had for a while but due to pressure of work (as always :( ), hadn't actually used. I fell in love with this kit as soon as I saw it, and it seemed perfect for a romantic Valentine's album:

Isn't that gorgeous? This is a really beautiful kit, and I have plans to make much more use of it! But back to the library pocket set....
I started with the template, printed it out on plain white cardstock and then cut it out (I don't have a cutting machine although that is now top of my wish list!). However, I did extend one side in order to make the album as shown here:

I cut out six pockets and six tags (on cardstock with the digital papers printed on), then cut two covers to fit, covering those with printed digital papers. I put the album together using my Bind-it-All machine and added skeleton leaves and organza ribbon to finish it off. Plus, since this is Valentine's Day and all, I added some hearts using a Stampin' Up! punch. I distressed the edges of the hearts using Milled Lavender distress ink, and added extra hearts to the inside pages using distress ink and the negative from the punched hearts:


The flower is from my ever faithful Tim Holtz tattered florals (I really don't know how I ever managed without that die!):

I love that die and it really shows up the variation in pattern on the papers.
Here are tags:

And the inside pages:


Love those papers from the kit. Of course, you can use any papers and I am already part way through another album using Stampin' Up! papers.
I then decided to use another of Adela's templates that I have, Tray Chic:
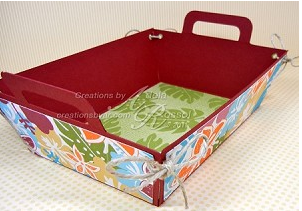
Isn't that neat? I again used the same digital kit, this time with added Cadbury's buttons!


The buttons add the perfect finishing touch, don't you think?!!! Of course, they are not going to last long in this household!
Please do take a look at the other entries in the blog hop. Adela has some gorgeous templates and they have done some amazing work with them. Your next stop on the blog hop is Gina.
Please remember to leave a comment below (and on the other blogs) to be in with a chance of winning an as yet unreleased template from Creations by AR. Comments will be accepted through midnight Eastern time on Sunday, February 10. The blog hop winner will be announced on Monday February 11 on the Creations by AR Facebook page as well as on my blog.
Happy scrapping!
This is just a flying visit as I am in the middle of tax return filing season and don't have much free time at all. However, I thought I would just pop in to show you what I have been working on! I've been using a kit that is slightly out of my comfort zone - I mean, you are looking now at someone who only goes to the hairdressers twice a year for a perm and the thought of journalling about that really does not inspire me! Still, there were some lovely papers in the kit and some neat elements. But really, you need to see what I worked with, don't you?!!!

It's a kit from Nibbles Skribbles and I just love the colours in it and even though I really like the journalling tags, I didn't actually use them this time around, preferring instead to leave space for more photos in this album. Mind you, I can see some of these being really useful as the front of birthday cards and so on, so I know I will get more use out of this kit ;)!
Since it is a kit with a hairdressing theme, it just shows how versatile it is and that you don't have to do anything about hairdressing to make full use of it!

The above photos show the front and back covers. I added one of the kit clusters to the front cover, although I did have to chop off the splatter behind the cluster - I know I'm not the best fussy cutter in the world, but even the best would have had trouble cutting out a paint splatter!
These are some of the inside pages:

and here are some more:

Well, I have been trying for what seems like a month of Sundays to find the time to get this posted, as I made this a while ago, then the photos sat on my camera for ages, and the final previews have been on my hard drive for a week now.... where does the time go and why can't I have more than my fair share of it? I really do need at least 25 hours in the day and 8 days in each week to stand any chance of getting done everything I need to do.....sigh!
Anyhow, this is what I was working with:

Isn't it gorgeous?!!! I really love those colours although m,y printer didn't! Whether it was the ink or the printer settings or what, I just couldn't get them to come out right. I was obviously not doing something right, but thanks to Photoshop, the actual photos are better ;)!
This time around, I decided to make an altered tin. A friend gave me some empty cigar tins a while ago and I thought it was about time I used them so this is what I ended up with:


I'm planning on making more tags to go put inside the tin, but exactly when I will ever get around to that, your guess is as good as mine :)!!!!
Happy scrapping!
Well, I managed to persuade hubbie to let me buy two new Bigz dies in the Sizzix sale yesterday. They were such a bargain! I picked up a scalloped rectangle album for £7 instead of £28 and the reindeer which wasn't quite so much of a bargain (only reduced from £13.99 to £8.40) but I have had my eye on this for quite some time. I am now eagerly awaiting the postman, but it says on the Sizzix website it could take as long as ten days. TEN DAYS????!!!! Don't they realise I have crafting needs, Christmas will soon be here and gone and where is my reindeer? I'd like everything in the post please, preferably yesterday (even though this time yesterday I hadn't even ordered the dies....) but failing that, Monday morning...or rather early afternoon since our postman changed the order in which he does his rounds and we now have to wait until lunchtime to get any post.... Chances are I won't get these until at least the end of next week and that is if I am lucky and Sizzix haven't already run out of these dies!
So, in the absence of these much longed for dies, I decided to get crafting, get out my Big Shot and look see what I made:

Isn't that one gorgeous poinsettia and that brad is to die for. It's a Stampin' Up! antique brad and I tell you, they are absolutely gorgeous. In fact, they are so gorgeous, I just do not want to let them out of my hands and the only reason I used one here is that I can give this pillow box to my daughter for Christmas and get the wrapping (and the brad ;) ) back! If I was Gollum, these would definitely be my precious!!!
The pillow box was made using a Sizzix/Stampin' Up! pillow box die and is just big enough to hold two Cadbury fudges from a Heroes tin.... don't ask where the rest of the chocolates went to, some of them went into my son's advent calendar, and the rest...well, that's my secret! The poinsettia was made using a template from Paper Garden Designs:

The files are so easy to use but since I don't have a cutting machine, I actually used the png files, then layered papers from this kit to make the petals/leaves:

Aren't those colours gorgeous and I love those flowers! The leaves are relatively easy to cut out using scissors, so don't let the fact that you may not have a cutting machine put you off. A cutting machine is on my wish list but an iPad comes first (as and when I can afford one)!!!!
The gift tag was again made using papers from the kit and the centre of the button on that white snowflake flower in the preview but I also used the ornament png from these cutting files:

Aren't they neat? You can actually use them for gift tags or for cards and I will let you see how the cards I am in the process of making from these turn out later.
In the meantime, I need to go get the church notices started and then make some bible verse tags but before I go, I'll leave you with my new siggie for the Digichick forum that I made using the Glitter and Memories collab:

I just love that kit! It has so many scrumptious items in it!
Happy scrapping!
Just to let you all know that there is a great gift blog hop going on from Paperie, Technique Junkie, and Sweet 'n Sassy
Stamps and it is well worth a visit to each blog for some amazing Christmas inspiration!
Just take a look at this for some creative gift wrapping:

Aren't they gorgeous? You can find them HERE and also follow the links to the blog hop as well.
Happy scrapping!
Well, they have some amazing templates and cutting files at The Digichick, and I just couldn't resist having a go at making a vase and flowers. I've been wanting to make a vase for ages, and when the chance came to use a bag template (yes, you heard right, a bag template;) ), it seemed the perfect opportunity.
I used the following items, firstly this gorgeous collaboration kit from the Digichick Designers:

Then I used two sets of cutting files from Kelleigh Ratzlaff:


Well, November was really hectic (but hey, when is my life not hectic?!!!) and the bast part, apart obviously from seeing my son and his girlfriend when they came over to celebrate his birthday (awe, my baby is 27!!!!), was becoming a member of the hybrid team at The Digichick. I've loved their site for absolutely ages and was over the moon to become a team member - it is, literally, a dream come true ;). My son is well impressed (apart from my daughter and mum (she makes all her own cards too), he is the only other member of the family who takes an interest in my crafting) and I haven't even bothered telling hubbie about being on the hybrid team as he will only go on about how busy I am and how come I think I can do this and work and blah, blah, blah, blah!
Anyhow, for my first project (and tutorial!!!) I decided to make a Christmas album/planner. Yes, I am totally disorganised, and yes, I haven't done anything for Christmas yet (other than put up the mini tree in my office!) but I intend to get organised and this planner is a start..... Anyhow, if you are anything at all like me, maybe you should have a go at making one of these too?
I'm not going to go into great detail here about what, where, who and how I made it as you will be able to find it all on The Hybrid Chick blog from tomorrow (Monday). However, will show you what I used. Firstly, this is the kit I worked with:

Pretty neat for a Christmas album, eh, and perfect for a planner/organiser! I just printed off what I needed onto cardstock and paper, added double sided tape and glitter glue, and et voila, one Christmas album!!! Well, it did take a little bit longer than that to make, although to be honest, it actually took even longer to take the photos and write and post the tutorial than it did to make the album, tags and cards!

And here are the inside pages:

You will see I also made some Christmas cards and tags to go with the album. The tags were made using the kit and a selection of templates from Michelle Batton:

These are so useful and you can do so many different things with them. I reckon they would make brilliant card backgrounds once printed out - all you would have to do is add embellishments. IO just used them for journaling here, and this is what I ended up with:

I reckon I'll be able to use these for all the lists I need to make for Christmas....presents, stocking fillers, shopping list, work to do before the big day...... Can you tell I am a list kind of person?
The cards are A6 size so can fit into the album (which is A5 size) so if I am out and about, I can whip out a card for someone in no time at all ;). The cards were made with these brilliant digital stamps:


I love that music and swirls stamp and can see me using that on birthday cards in the future ;). these are the cards I made with them:

Mind you, I did add some Christmas Ornaments made with the Stampin' Up! Ornament Keepsakes bundle and the purple-y paper is from Stampin' Up! too.
Like I said earlier, if you want the full details of how to make this album, take a wander over to the Hybrid chick blog tomorrow. My album is quite plain, I didn't add any embellishments, but I am really pleased with how it turned out. Mind you, next year, I think I will make an earlier start on an album so I can dress it up somewhat!
Happy scrapping!
There are some awesome sales on Friday, and just look at what Nibbles Skribbles has on offer:

Now I don't know about you, but I love making my own calendars every year, so this is an ideal time to get some quick pages and dates, then all you have to do is add the photos and voila, one unique calendar which you can print and send as a Christmas gift. I'm actually going to go one better this year, as I am seriously considering getting these printed My printer just seems to eat ink so it must be cheaper to get someone else to print it for me plus it would save all that hassle missing around with my Bind It All trying to make sure everything is lined up perfectly!
But look at what is available:

Aren't they neat? And even better, I actually made one of them using one of Manda's kits. I'm not going to tell you which one, just see if you can guess ;). You can get them in a bundle with the grids for each month, the images and wordart at The Studio:

Everything you need (apart from the photos ;) ) to make a unique calendar! I know I am definitely going to get myself one of these and will try and get this done over the weekend! Unfortunately I have a couple of VAT returns to do before the weekend, as well as several tax returns, so scrapping will have to wait for a few days as I need to get the work done so I can get paid:(.
But I will definitely be popping over to The Studio on Friday as they will have some amazing deals......

I just love sales!!
Happy Scrapping!
Just a quick post to let you all know that I am now a Hybrid Chick over at The Digichick!
They had a hybrid team call a couple of weeks ago and I applied, hoping to get a place but not really expecting it and then at the end of last week. I was told I was one of the new team members! I am so excited at this as I just love The Digichick as they have so many gorgeous hybrid printables, templates and cutting files.
I'm not giving up any of my other CT spots though, as I just love hybrid, and enjoy so much being on the teams for The Studio, Aimee Harrison, and Nibbles Skribbles. I'm just over the moon at having so many wonderful designers to be able to pick and choose from!
Anyhow, I've got nothing to show you at the moment as everything is either still on my camera or half completed. I do have a couple of cards almost ready to show you and am half way through an altered cigar tin, but I have a craft fair on Saturday and need to make advent calendars, Christmas ornaments and cards as well as gift bags, so I reckon I'm going to be busy over the next few days;).
I'll be back as soon as I can with lots of goodies to show you ;)
Happy scrapping!


