




Well, it seems an age since Mum and I went to Alexandra Palace but we had a whale of a time. We left home early and managed to get to Ally Pally about half eight in the morning, so were able to get a parking space just outside the Ice Rink. We then had a gentle wander around to the entrance and whiled away the time with coffee and a bacon baguette which we shared!
The queue to get in was already starting to build up when we got there, hence the coffee break as mum can't stand for long, We went in after the first rush and I did think that since there were far fewer exhibitors than at the NEC we would be in and out in a couple of hours. I was so wrong in that as by lunchtime, we had still only reached the second row of stalls (we started at the bottom and worked our way back to the entrance)! I managed to spend all the money I had left over from the NEC plus some extra on top so it was a very successful day!
I still haven;t had chance to do much as yet as my other news is that I have become a Stampin' Up! demonstrator. I have a new blog for this (well, all I have is the original page and the blog name as I haven't had chance to post anything or even change any of the default layout as yet but I am hoping to get all this sorted this weekend and will let you know the details then!
I've actually been busy these past few weeks spending most of my time at a client's trying to finalise their 2012 accounts and today I finally managed to get the accounts finished and the tax returns filed online so I am definitely in a celebratory mood tonight. I am about to go get a glass of red wine and am only sorry I don't have any chocolate to go with it!
Still, I though I would leave you with a photo of a mini album I made last week. I used Color My Wold by Aimee Harrison Design Studios and she is a star as she even included the proper spelling of colour in the wordart in the kit!

The kit is lovely, and is definitely the sort of thing you can easily use for albums and cards, it is so versatile. I have plans to make a couple of birthday cards with this but as usual, work has taken priority....still, it is the bank holiday weekend coming up, so who knows?!!!!
Anyhow, back to the mini album and here it is:

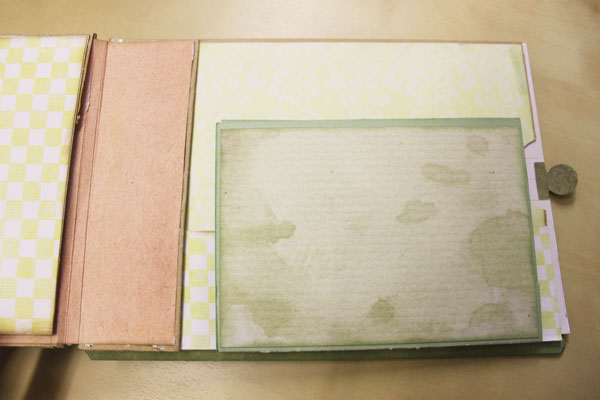
I printed one of the kit pages on top a sheet of A4 cardstock and then folded and cut the card to make the album. the lace effect on the edges is from another kit page which I used my Tim Holtz Vintage Lace die on. I printed and cut out two copies of one of the flowers and then added a gem to the centre before gluing onto the front cover of the album.
Inside, the pages were stuck together using buttons printed from the kit to make the holders for the tags. The tags were made from the kit using papers and elements. I left the backs of the tags blank so I could add journalling, and there is space on each tag for mini photos.
I love the way this turned out and it was so easy to make, too. As usual, though, it took longer to cut out and stick everything together than anything else!
Oh well, that glass of red wine is calling my name now so I'm off to celebrate filing those tax returns!
Happy scrapping!
Well, as promised earlier, this is a look at my pages from the March Project 3265 kit by Digilicious Designs:

It is yet another beautiful kit and a real joy to work with. I just love the versatility of digital kits, and the best thing is you can use them again and again unlike paper kits when once you have used the paper, that is it, it is gone.
I didn't make quite so many pages this time round, mainly because my folder was getting full and I wanted to leave room for inserting photos, tickets and stuff. I used an A5 folder which I recovered using the Project 365 January kit, and the pages are made from papers printed into A4 cardstock. I print two pages to each sheet of A4 so that when folded, they fit into the A5 folder nicely.
I love all the delicate flower work in this kit, and the butterflies are just gorgeous (there are 3 different ones in the kit). there weren't quite as many notecards this time round, which gave me the chance to create my own pages (not that I couldn't have done that with the earlier kits though, but I just felt lazy and used the notecards!).

the alphas in this kit are really gorgeous. I love the grungy type of paper/element, so they really fitted in well. Then just look at this dress model. Isn't it gorgeous?! It really makes me want to go and get the Tim Holtz sewing room die!

I love the little "note to self" too.
Please excuse the over exposure in the photos. My office has no windows, so it is all artificial light plus the flash from my camera, and even messing around in photoshop afterwards doesn't seem to fix it quite right (which probably has more to say about my poor photoshop and photography skills rather than anything else ;) ).
Then look at the double page of the bird baskets hanging from the trees - I just sat and ooh'd and aah'd when I first saw this in the kit!

I really need to start using this book now that it is complete but where on earth do I find the time? Life seems so busy at the moment, with work and everything else that is going on. I know I am always saying this, but I really need an extra hour a day and an extra day a week to be able to stand any chance of getting half the things done that I need to do!
This week would have been ideal to catch up on crafting, but if my mum is up to it, we will be going to Alexandra Palace for the craft fair there. the really good things is they have free parking, so that means I can drive to London and park for free not that far from the city centre. Now that was an offer too good to miss as parking in London is extortionate!
I'm really looking forward to this. Dad is coming along too (so he can go wandering around London whilst we are at the craft fair) and my daughter is also tagging along as she is going to meet her boyfriend in London. He's getting the coach up and they will spend the day sightseeing. Mum and I will be having a whale of a time at the craft fair and hopefully will pick up some bargains. I have heard that it is a great event if you are a stamper and much better than the NEC, although there are nowhere near as many exhibitors. If you are going, look at for me and my mum. I'll be the one with glasses carrying all the bags and she's the one with two walking sticks!
Happy scrapping!


I have to say that this series is turning out to be one of the best collections ever and I love every kit so far. They are all different, so it is not a case of elements, etc being recoloured for each month. Each kit stands on its own and the notecards, papers and elements are all unique. One or two elements are similar (the pointing hand, for instance) but that is only to be expected in a Project 365 kit.
I've actually just finished making more pages with the March Project 365 kit so will be back later to show you pictures of those but unfortunately, I now have to go check my inbox which has over 400 unread messages in it....this is what comes of not checking your emails over the Easter weekend!
Happy scrapping!
Well, I hope you have all been enjoying the Easter break and haven't had to work over the weekend. I have been very lazy and have spent most of my time crafting although I did manage a trip to Attingham Park with my daughter as well as a shopping trip!
Last week was a real rush to try and get everything finished before Easter. I ended up spending all of last Wednesday night making Easter baskets and Easter milk cartons to give as gifts on Thursday, so as a result didn't get to bed until gone 2 am....I really don't know how people manage to get everything done well before time. I always end up leaving everything to the last minute and rushing to get everything finished as things always take me longer than anticipated....maybe I should just try to be more organised and make a start well before the due date?
Anyhow, I was lucky enough to be able to work with Clearly, by Aimee Harrison Designs:

It is a gorgeous kit and the whole collection is actually on offer at the moment so is a real bargain! Whilst it is not your typical Easter kit, there are some really lovely papers in there. I only ended up using three of them, but this is what I made:

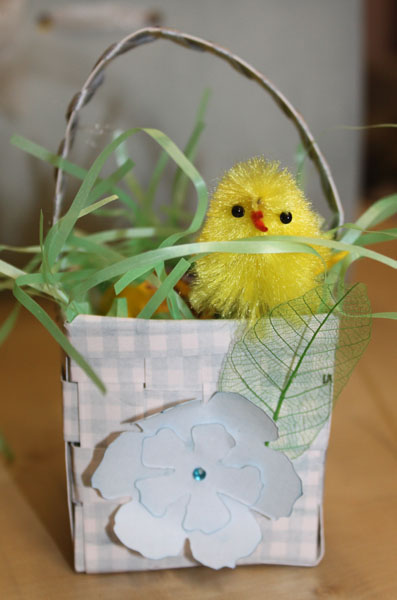
The blue basket was given to my daughter, but I actually made some using one of the brown papers in the kit which, to be honest,m I think turned out better. the strips were wider (about 2 cm) so they were easier to manipulate and weave. I was really pleased with how they turned out.

You can see the milk cartons I made as well lurking behind the baskets. They were so easy to make, it was basically a case of using the template from Stampin' Up and sticking the whole thing together. The only fiddly it was trying to work out how the top went together, and the ribbon soon hid any mistakes I made! I actually think the cartons would have looked better with tags or a label at the front, but since it was 2 am by the time I had these finished, I really didn't feel up to doing any more!
Then finally, I made a gift holder for my youngest son, and yes, I know it's a bit girly but I was experimenting and needed a large holder to cover the Cadbury mini eggs hidden inside, plus it was Saturday evening and I needed this ready for Easter Sunday morning! As you can see, the tattered florals die was used again (oh, I love that die!) on the kit papers along with my distress inks. The trim at the top and bottom was made using one of the kit papers and the Tim Holtz Alterations vintage lace die.

I reckon the all of these can be used other than at Easter so why not give it a go yourself? I love being able to use digital papers, and elements as you never have to go back to the shop to buy more when you run out - you just print some more!
I'm off not to run a payroll - no rest for the wicked, eh? So have fun whatever you are doing and happy scrapping!
Woohoo! As you can see from my new blinkie, I have just become a member of Aimee Harrison's Creative Team and I am over the moon! I'm in the process of finding out exactly what is involved in being a CT member since whilst I am on the Hybrid CT at The Studio, being on the CT for a specific designer is more involved....
I'll still be making hybrid items as opposed to digital layouts (you just can't beat the combination of digital with distress inks and glue!), and am really looking forward to getting started. Aimee has some gorgeous kits and is really organised, so I am sure I can pick up some good habits from her that I can even carry over into the work side of things!
Whilst I am still finding my feet, I was given "Everlasting" to work with. This is a scrumptious kit as you can see:

The preview is linked to Aimee's store at The Studio where it is currently 30% off!
When I saw the stacked papers, I immediately thought of another organiser board like the paperclip board I made earlier in the week, but this time, I adapted it even further:


Well, I was over at Paper Craft Planet and saw this week's 3d challenge was to make a paperclip board. How could I resist a challenge like that?
I managed to get my grubby little hands on Cardboard Passion by Lara's Digi World:


You remember the smash book/alerted folder I created a few weeks ago using Digilicious Designs Project 365 for January? Well, I was over the moon when they asked at Digishoptalk if they could include it in the March edition of Insider magazine :) !!! I was really chuffed as my grandmother would have said, to think they thought it good enough.
Insider magazine came out last week, so the very first thing I did was check to see if I was in the hybrid picks category :) I'm still wearing the big grin on my face from seeing my work published at DST! I know I'm sad and really need to get a life, lol!
Well, with work being less hectic at the moment, I have had chance to get around to making more hybrid items, and I was fortunate enough to be given the chance to work with Delight of this day by PrelestnayaP Design:

It is a beautiful kit to work with, and just the sort of thing to use for Mother's Day, which is coming up here in the UK at the end of March. Now I have made altered notebooks before now, and one of my friends came up with the idea of using these in a card so here it is!!!


I used double sided tape to attach the background to the base card, only taping on three sides. the top was left unstuck so the notebook could be slid inside. I made the card so that it was as stand alone card as well as a notebook card holder, and I actually think they turned out really well. I did have to do some jigging around with the "Just a note" on the notebook to get it placed right, and this was a trial and error effort as my first attempt had the text to close to the flowers once it was printed out.


Guess what card my mum is going to get for Mother's Day?!!!
It seems like an age since I last posted, yet is has only been a couple of weeks which, for me, isn't bad going! Work is beginning to pick up again, not that it was ever quiet, but I now need t finish off stuff I didn't get chance to at the end of January plus do the new accounts, etc that have come in., as well as start the P35's and PIId's. Life just seems to be one deadline after another!
So, never one to do work when the opportunity arises to do something more interesting, I decided to have a play with my zoom lens. I was actually pegging out the washing when I noticed a robin on the fence. So I dashed inside (well, crept actually, so as not to frighten the robin!), grabbed my camera and zoom lens, hit behind the washing on the line and took these:


And look what we saw when we got into the deer park?!!!


They put food out for the deer this time of year so at weekends, if you time it right, you get to see one or more of the herds of deer. They are used to people, so I was able to take photos and, having my zoom lens with me this time, I could get some close up shots too.
They have opened up a new p[art of the woodlands at Attingham Park too since we were last there, and this is completely new (or at least new to us ;) ):

You can't get into the hut, the door is blocked inside by branches and soil and stuff, but the walls are made of clay and it is apparently to demonstrate how you would build a home if you had no modern man made materials. The path in this part of the woods leads back to the peacock carving:


We then went on to Shawbury Garden Centre which was recently taken over by new owners. They don't have that much there at the moment, but you can see how they will be developing the garden centre as they have done loads of work. I did, however, manage to pot of white hyacinths for my office, so in a few days or so, the office should be filled with the beautiful aroma of blooming hyacinths! We had a lovely afternoon and finished it off with fish and chips from the chip shop at Tern Hill. My youngest reckons they make the best chips around here!
Anyhow, that was my Saturday, so I'm now off to do some crafting!
Happy Scrapping!


 Posts


